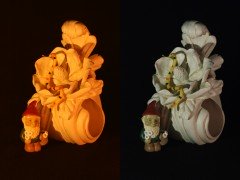
During the time of film cameras, filters were used to correct the white balance or lighting errors. Most people just wonder why their indoors pictures show the white color as with a yellow, orange, or blue shade. That’s because the white color that looks white to the eyes does have a color tinge. The reason that pictures turn out with a yellow/orange cast in incandescent (tungsten) lighting and bluish in fluorescent lighting is because light has a Color Temperature. Different light sources emit light at different color temperatures, and thus the color cast. The following are the approx temperatures these different light sources emit:
- Daylight – 5200 Kelvin
- Flash – 5400 Kelvin
- Cloudy – 6000 Kelvin
- Shade – 7000 Kelvin
- Tungsten Light – 3200 Kelvin
- Bulb Light – 2700 Kelvin
- Candle – 2000 Kelvin
A low color temperature shifts light towards the red while a high color temperature shifts light towards the blue. By using a filter, we absorb that particular color light to correct for the “imbalance”. The result is called a Shift in the color temperature.
In digital photography, we can simply tell the image sensor to do that color shift for us. This is where the concept of White Balance comes in. If we can tell the camera which object in the room is white and supposed to come out white in the picture, the camera can calculate the difference between the current color temperature of that object and the correct color temperature of a white object. And then shift all colors by that difference.
White Balance Settings
The digital cameras provide various white balance settings for adjusting the color temperature of light. While most of the times you can set it to auto, try using one of the preset modes and see the how the look & feel of the image changes. Refer your camera’s user manual to play around with White Balance settings as listed below:
Auto White Balance: Most of the DSLRs now come with an Auto White Balance (AWB) function. AWB works very well in sunny and cloudy outdoors, and fine for most indoors situations. You will experience a light color effect in some of the indoor pics while using this mode. Try for yourself. Set your digital camera to AWB and take pictures under tungsten, fluorescent, and mixed lighting (i.e. tungsten or fluorescent, plus natural light coming through the window), and see if the results are OK. If they are, you can just use AWB.
Preset White Balance: To help us from complete automatic white balance problems some cameras do come with different preset variations such as Tungsten, Fluorescent, Cloudy, Sunny, etc. Using preset WB can improve on a picture, especially under indoors lighting. Usually just selecting a preset WB setting appropriate for the lighting situation is enough.
Manual White Balance: Most advanced digital cameras therefore provide the feature to manually set the white balance. By pointing the camera at a white light source as a neutral reference, filling the screen completely with it, then pressing the White Balance button (or set it in the menu), the camera does its WB calculation.
From then on, any picture taken will have its color temperature shifted appropriately. It’s quite simple, really, and you should not be afraid to try it out and see your indoors pictures improve considerably (assuming there is enough light for correct exposure).
Just beware of mixing artificial lights, if any, and also beware of fluorescent light: since fluorescent light does not contain all the spectrum of light, you may obtain unexpected results.


I find that using the Kelvin Scale on my D-300 is a lot of fun, and shooting urban sunrises and sunsets you can come up with some very unusual and interesting color combo’s.